Standing up a FHIR Testing Server
-
What options are available for hosting FHIR data for testing and training?
There are both cloud-based and local options for hosting FHIR servers, with varying levels of capabilities, ease of setup and access, and performance. As always, the best option depends on the specific use case.
This module includes:
an introduction to HAPI, a FHIR test server,
other options for test servers,
loading Synthea synthetic data in a test server,
and additional testing resources.
The approaches listed in this module are intended to be the quickest and easiest options for setting up a FHIR server for testing and training. Other options do exist, and for production capabilities you may want something more robust, but the options here are the best way to get started fast. The options on this page often include a set of default patient data which can be used for basic testing, or you can load your own data created by Synthea.
1 Test Servers
1.1 HAPI FHIR Test Server
There are several public test servers listed on HL7® Confluence, along with basic information and limitations of each. The list is updated periodically, but the servers are public and run on a voluntary basis. Some links may break.
The HAPI FHIR server, which is on the above HL7 list, is a well-known and reliable option. It is a good test server to begin with, and meets most testing needs with the least amount of friction to get started. There are other options for those interested in exploring further though, which are covered both on the HL7 list of public test servers and in Other Server Options.
- HAPI FHIR Reference Server
- Web UI: http://hapi.fhir.org
- DSTU2 Endpoint: http://hapi.fhir.org/baseDstu2
- STU3 Endpoint: http://hapi.fhir.org/baseDstu3
- R4 Endpoint: http://hapi.fhir.org/baseR4
- R5 Endpoint: http://hapi.fhir.org/baseR5
To quickly pull and run the HAPI FHIR server on port 8080, make sure Docker is running, and then run the following:
docker pull hapiproject/hapi:latest
docker run -p 8080:8080 hapiproject/hapi:latest
Wait until the logging output shows Started Application in ___ seconds and you will have a FHIR server running with a base URL of http://localhost:8080/fhir. There is also a web UI for a few actions such as listing and uploading resources at http://localhost:8080/.
For more detail on the HAPI FHIR Docker image, see https://hub.docker.com/r/hapiproject/hapi.
1.2 Other Server Options
If the HAPI FHIR server does meet your testing needs, there are a few options: Docker-based servers, Logica Sandbox Community Edition, and MELD.
1.2.1 Docker-based servers
Docker is a tool that runs packaged software locally. Packaging software to run on Docker means it can be preconfigured with all necessary dependencies, allowing it to run on nearly any hardware and operating system. This differs from traditional software, which often requires separate builds or development for Windows and Mac, may need additional libraries to be installed beforehand, and can involve a complicated setup process. Docker is commonly used for running servers.
While Docker-based options generally require some configuration, especially when you want your test data to persist after you reboot, they can be setup quickly without programming experience. Although, Git is required for several Docker-based options.
Detailed technical documentation on Docker is available at https://docs.docker.com/get-started/overview/. To get started, Docker offers step-by-step instructions at https://docs.docker.com/get-started/introduction/. (Note that Docker Desktop is generally not free for organizations and professional use. There are free alternatives however they require more manual effort to get everything working. Setting up an alternative to Docker is outside the scope of this page.)
If you intend to run research on a server that is not based on HAPI, below are a few setup guides for Docker-based FHIR server implementations:
- Microsoft/Azure FHIR Server
- LinuxForHealth FHIR Server (formerly IBM)
- BlueHalo FHIR Server (formerly Asymmetrik)
- fhir-candle, which is a small, in-memory FHIR server meant for testing and development (not production use cases)
1.2.2 Logica Sandbox Community Edition
A cloud service, like Logica Sandbox Community Edition can be a low-friction option to get started—no installation is required on your local computer. Additional benefits include free registration, a shareable common instance between multiple people, and persistence across computer restarts. The Sandbox Community Edition can be run using Docker, but due to the number of individual services needed, using it requires a non-trivial amount of setup and knowledge of Docker.
Quick Start Make sure Docker is running, then clone the project, change to the directory, and launch the services with the following commands:
git clone https://github.com/logicahealth/sandbox-community-edition.git
cd sandbox-community-edition
docker compose up
Launching the services will take a while the first time as it needs to download the Docker images. Wait until the logging output stops, then open the sandbox at http://sandbox:3001. From here the steps are identical to the steps for the cloud service steps listed above.
Full instructions are available at https://github.com/logicahealth/sandbox-community-edition.
1.2.3 MELD
MELD is a hosted service, similar to the Logica FHIR Sandbox, offered by InterOp Community. It is available at https://meld.interop.community.
Relying on any free hosted service has a few downsides: you are dependent on the service staying online and providing appropriate security to make sure your data is accessible to you and only to you. Real health data and synthetic data containing alterations you want to keep private should never be uploaded to an online sandbox service. Anything stored in an online sandbox should also have a local backup copy, just in case.
There are no published limits to the software in terms of the number of Patients, number of Resources, physical size, or bandwidth usage. However, we recommend keeping your population as small as possible—both in terms of number of patients and the total amount of data per patient—to ensure good performance. Uploading files larger than roughly 2 MB may cause timeouts. If a timeout occurs while uploading a file, wait a few minutes for it to finish processing before trying again. The server will throw an error if you try to upload a second patient while one is already processing.
MELD Signup Steps
To create your own MELD Sandbox, first register at https://meld.interop.community. You will need to provide an email address, where you will receive a confirmation email which you should click to activate your new account. Sign in using your email and password and accept the terms of use.
Now you can create a new sandbox by clicking the New Sandbox button. The creation screen is shown below.
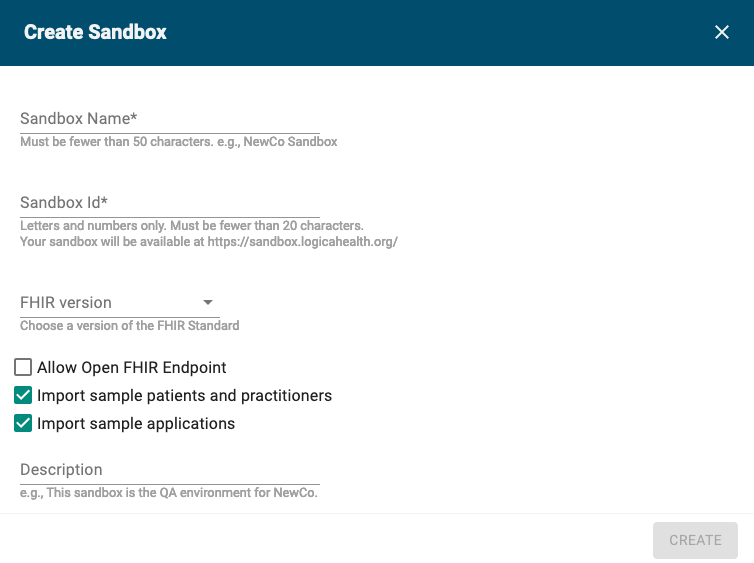
Choose a name, ID, and FHIR version that are appropriate for your usage. We recommend enabling the, “Allow Open FHIR Endpoint” setting as this will make it easier to load an initial set of data, and it may be disabled later for security.
If you plan to load patients for a specific use case, you may want to disable the, “Import sample patients and practitioners” option to ensure only your selected patients are loaded. Feel free to select or deselect the sample applications option - it will have no impact on basic FHIR operations.
After clicking create, it will take ~15 seconds to setup the instance. Once ready, click on the row to go to the dashboard for your server. You can then visit the Settings tab to see your “Open FHIR Server URL.” This is the server base URL that should be used for loading patients in the Loading Synthea Patients section below. If you want to require security on the server, once you have loaded all the patients you want, return to this Settings tab and click the pencil icon to edit, and uncheck, “Allow Open FHIR Endpoint.”
2 Loading Synthea Data
Finally, once your server is running, you can load your Synthea data into it. In this section we assume you are using the default Synthea settings: FHIR R4, Bundles are of type transaction, all resource types are exported, etc., since certain setting changes may affect how you load the data. It is completely fine if you ran Synthea multiple times and your output folder contains several runs all mixed together, but it can be difficult to separate them out if that is the case.
We recommend using the curl utility (which should be available by default on most computers, but if not it can be downloaded from https://curl.se/download.html), with the following arguments:
curl -d @FILE -H 'Content-Type: application/json' SERVERwhere:
FILE is the path to a FHIR Bundle .json file
SERVER is your FHIR server's base URL
-H 'Content-Type: application/json' sets the content type to JSON to ensure the server handles it correctly
If you strongly prefer a graphical tool, Insomnia, which allows you to invoke APIs such as FHIR endpoints, is a good choice. For uploading multiple files though, the snippets below which call curl in a loop are likely to be the easiest. If you have experience with other tools such as Postman, feel free to use those instead.
The key to loading Synthea patients is to ensure files are loaded in the following order, so that references to resources across files will work correctly. You should not see any error messages when loading files. Replace SERVER in the following examples with your FHIR server’s base URL.
First, load all hospitalInformation*.json files. These contain the Organization resources that are referenced by Encounters in the patient data.
for file in hospitalInformation*.json
  do curl -d @$file -H 'Content-Type: application/json' SERVER
done
Second, load all practitioner*.json files. These contain Practitioners and PractitionerRoles.
for file in practitioner*.json
  do curl -d @$file -H 'Content-Type: application/json' SERVER
done
Finally, load all individual patient files. All patient file names start with a capital letter, unlike the hospital and practitioner files above, so we can use that to select just the files that were not already uploaded in the previous two steps.
for file in [A-Z]*.json
  do curl -d @$file -H 'Content-Type: application/json' SERVER
done
Once all the data has been loaded onto your server, you can access it as any other FHIR server by making API calls to the various resource endpoints.
3 Additional Testing Resources
3.1 Cloud Computing Resources
NIH Strides is a initiative to make commercial cloud services accessible and affordable for NIH researchers. Cloud services offer infrastructure that can include bundles of tools like computing power and storage for a pay-as-you-go basis. They currently partner with three cloud providers: Amazon Web Services (AWS), Google Cloud, and Microsoft Azure.
Some particularly helpful references for learning more about STRIDES and research possibilities include:
3.2 SITE
The Office of the National Coordinator for Health IT (ONC) has a collection of interoperability testing tools and resources, called Standards Implementation & Testing Environments (SITE). Many of the tools are designed for developers that are seeking ONC Certification of an application that uses FHIR, rather than using FHIR for research. However, there are General Tools, including the Lantern Dashboard, which indicates open endpoints and the Inferno Resource Validator.